The following are the Marshal's reports of recent occurrences of peacekeeper activity from events at or near to Games & Stuff in Glen Burnie, MD. All reports are provided directly from the surviving ranking officer and are considered accurate and true.
Marshal's Report
 |
| Search and Recovery Target - Relic Vehicle |
Unexplored Ruins - Search and Recovery
Reported by: Marshal O'Halihan
Date: October 21, 2086
Unit Details
Marshal O'Halihan
K-9 Handler Mutt
K-9 Units Dawg & Cagney
Officer Manny
Officer Flynn
Officer O'Brien
Officer Scullin
Activity Report
During some downtime in one of the regularly patrolled settlements, the Gardia were approached by a wild haired, rambling, older gentleman dressed in some sort of laboratory coat with an offer. He stated that he had located a relic, but was unable to recover the item and was looking for a group to recover the item. The item, a relic vehicle of some import, was located about 2 km to the west on a long-abandoned small town main street. Marshal O'Halihan agreed on a price and accepted a contract from the gentleman.
 |
| Mutants pressing through the ruins |
Because of the number of buildings located in the area, Marshal O'Halihan utilized a spread formation to approach from two separate directions. Sniper Manny, Officer O'Brien, and Officer Scullin approached from the northeast corner. Manny had previously scouted out a ruined building that he could use to provide support fire so the officers could approach and secure the relic.
At the same time, Marshal O'Halihan approached from a small copse of trees on some small hillocks with K-9 Handler Mutt and K-9 units, Dawg and Cagney. Supporting the, was Officer Flynn. The approach was a funnel, but offered some higher ground where Officer O'Brien and Dawg could provide cross fire with Sniper Manny.
 |
| Gardia securing firing arcs |
Not long after starting the approach, Sniper Manny noticed a lone caravanner approaching from a distant heavily wooded area in the southwest of the town. When he was able to get the caravanner in focus, he was able to identify him as Sven of Killee's band. With a quick shot, he caught Sven by surprise and was able to send him scrambling for cover. After this an additional caravanner made a hasty approach toward the location of the relic vehicle.
It was quickly apparent that Killee's caravanners were in the area for the same reason as the Gardia, to recover the relic vehicle. As with many things in the wasteland, success is not guaranteed and as insurance the old man had hired another group.
 |
| Caravanners moving to secure relic |
Mutt sent the K-9 units forward to engage, but when Cagney went to spring from the wooded hillock, she was wounded and could not go further. The set of mutants that Killee picked up a few weeks ago quickly moved through the ruins to try to secure the vehicle and make off with it. Marshal O'Halihan was able to quickly mark the mutant, Stop, and put him out of action. At the same time Officer Flynn caught Pots with near-hit and sent him scrambling for cover.
Quickly the rest of the caravanners made headlong for the relic in an attempt to overwhelm the smaller Gardia force. Sniper Manny was able to quickly put Sven down in the woods to keep him from the engagement. The other officers, Scullin and O'Brien made approach to the relic through the ruins to create firing arcs to prevent the Caravanner advance.
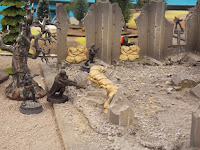 |
| Gardia approaching through ruins |
Marshal O'Hallihan and Officer Flynn took up locations at the tops of the hillocks to use the tree coverage and provide additional firing arcs to prevent Caravanner advance. Marshal O'Halihan was able to quickly Ms. Perfect as she returned fire from the corner of the ruined building. Marshal O'Halihan proved a better shot and put Ms. Perfect down. Killee opened up on Officer Scullin with her submachine gun, but none of the three shots were sufficient to penetrate the officers armor.
The caravanners continued the all out press toward the vehicle, taking up second story positions on the building at the southwestern corner at the vehicles location. Marshal O'Halihan took advantage of the close proximity of the caravanners and was able to quickly hit Mrs. Argyle, Swifty, and Mr. Flash. Where Swifty was wounded, the other two were downed and out of the engagement. Officer Flynn was able to put a shot on Mrs. Stuffings, but it was just a grazing shot and she went to cover but was not wounded. ant
 |
| Gardia eliminating caravanner rush |
Officer O'Brien was able to keep Black Widow pinned down in the woods to keep her out of the engagement while Sniper Murphy was able to eliminate the mutant Pots that previously fled the engagement. These last actions effectively eliminated the potential for the caravanners to continue the engagement and with the loss of overwhelming numbers and at a tactical disadvantage, Killee withdrew her group and abandoned the vehicle. The Gardia cannot determine the nature of the vehicle as it appears to be some high technology that would risk obliteration if activated. If that was even possible still.
Post Activity Update
 |
| Midpoint Algoryn AI Squad Figure |
When the Gardia salvaged the
Depend O'Bot ($6.50) in the Wasteland encounter, I immediately purchased two from
This Is Not A Test. But with the combination of personal things and pre-registration for
AdeptiCon 2016, I went back to the
Liber Metallica Seminar with Dave Taylor I had taken. With this seminar, we received a
Warlord Games Gates of Antares figure, specifically one of the
Algoryn AI Squad figures ($32.00 squad of 5 metal figures). This seemed like a good figure to use and it had the bonus of already being assembled and primed.
I decided to implement the Liber Metallica method with this figure so I started with by coloring all of the metal components with Vallejo Gunmetal Grey. This was the darkest of the gunmetal type paints that I have. I followed this immediately with a wash of
Secret Weapon Miniatures Soft Body Black Wash ($2.99). Now one of the important aspects of this method is to repeat color with washes to change the tone color up and down as you go, remembering that the light is coming from above.
 |
| Finished Algoryn AI Model (Front View) |
I tried very hard to keep the color scheme to a very limited palette. To deepen the spaces between the armor plates, I lined with Vallejo Black Ink. The cables were painted with Vallejo Black Grey and then washed with the Soft Body Black again. The gun was based with Vallejo Black and then there are touches of Vallejo Tinny Tin to give it a little pop. Who doesn't want a gun with a little pop.
 |
| Finished Algoryn AI Model (Rear View) |
He has a series of belt pouches and a jet pack on his back. I decided to give these a little color to break up all of the shades of black and grey. The base color for the pouches and backpack was Vallejo Dark Red. This is a really flat red and not really dark or deep. I layered above on the elevated surfaces of the backpack with Vallejo Flat Red. The vent for the jet pack got some touches of Vallejo Gunmetal Blue to give it a little of the heated metal look. The belt pouches were limited to the dark red. I also gave some touches to the face and the emblem on the shoulder pad with the dark red.
Now all of this didn't provide any highlights on the figure. To achieve that, I went to the Citadel Chain Mail. This is a lighter silver color. I applies this to the exposed surfaces of the figures, trying to imagine those parts that would get the most light and therefore be the brightest/most reflective. While it is entirely clear that I need some more work on tackling this technique, I am happy with the results and this will make a nice addition to the Gardia.
Achievement Unlocked!
 |
| Bronze Bombardier Award |
With all of the goodness at
Bombshell Miniatures, it hardly seems appropriate to get recognized for supporting them. Last week though, I received an unexpected package from Bombshell. Inside was great looking pin and with a certificate indicating that I achieved the Bronze Bombardier Award for my continuing level of support. In addition to this was a very nice hand written note from Patrick Keith thanking me for my continued support and help with spreading the good word on his materials. So my thanks to everyone at Bombshell Miniatures for the great stuff they produce and I look forward to the challenge of achieving Silver and Gold levels!


