Showing posts with label Vallejo. Show all posts

Thursday, February 22, 2018

A cozy place to lay your head...

Retro Chic 80's Hardwood Sofa

Too clean for the wasteland
This is a quick post of a sofa that was inspired by the great Jessica Rich who showed the basement of her camper in some online game. That basement is 80's themed and had a great hardwood sided sofa within it. It reminded me of one that we had when I was a kid. Hated that thing, uncomfortable and we'd run into it constantly. Terrible idea for furniture.

Well, it seemed only appropriate that a big dangerous hunk of wood furniture would survive everything and show up in your neighborhood wasteland setting for This Is Not a Test. So here is my take on that offensive (read that both ways) furniture.

The wood is painted up with the Delta Creative Ceramcoat Drk Burnt Umber with a wash of Citadel Devlan Mud and Vallejo Model Wash Brown. The cushions are painted with Reaper MSP HD Tusk Ivory and washed with Devlan Mud, Vallejo Model Wash Tierra European Dust, and Game Color Flesh Wash. Some stops were also hit with Reaper MSP HD Maiden Flesh.

Archie's Big Comfortable Chair

 While this isn't the real model of Archie Bunker's chair, that had a bunch of plaid I believe. One of the 2018 Painting Bingo Challenge for Model's Workshop is to "Find a reference picture and try to copy it for a mini". So I started doing some searching for chairs and then wanted to follow that up for a wasteland chair. I found an image and copied the look of this oversized chair (don't worry this is not an entry for the bingo, just an inspiration). Then I started to add wear marks on the chair, with the idea that this was well worn and somehow didn't catch fire in the fallout.

The chair is painted up with a base of Vallejo Model Color Flat Blue with some depth added using Citadel Enchanted Blue. The wear coloring is a combination of Model Color Grey Blue and Vallejo Game Color Glacier Blue.

Now these are far too large for any of the wasteland shacks, but as a scatter piece they are fun and potentially moveable in the wasteland. Perhaps some quick rules are necessary for release.

Modeler

For anyone following the Geek in the Basement blog, then you know the power of converting trash to treasures. Both of these piece, though sculpted originals, came from the great mind you may know as Geeky McBasement. This is a wonderful little set of scatter terrain that will work perfectly in the wastes. 

Here is a shot of the couch (for scale) with the Bombshell Wasteland Melee that I received and posted about before.

Wednesday, January 31, 2018

This Is Not a Test Demo Prep...Scatter Terrain

Tin Roof...Rusted

Base Coat Applied
This tin shack was made by one of my kids during a blizzard back in 2015. This has been kicking around for a while in my garage as are the other two that we assembled that day. The building of these shacks was a project to keep the kids busy one snow day. We started with a simple plan, make a one room structure that would be playable and with the appropriate look of something cobbled together in a wasteland.

Each person was provided an unlimited supply of "tin" sheeting. We used coffee cup sleeves from Starbucks and WaWa. For those outside of the Northeast US and Florida, WaWa is a convenience store chain. These, when flipped inside out, have great corrugations that look closely like tin sheeting or even corrugated steel. The back side is of course smooth so it allows for easy application to other surfaces. Most of this sheeting was cut into standard width and length sections of either 4' x 6' or 8' x 6'. This was to replicate what would be easily found within a DIY shop or scavenged from other locations that were already used. Smaller pieces were then cut to fill gaps or to add texture to the pieces.

The base and walls were made of standard foam core sheeting that is generally available for any kids craft/school project. I kept the walls to 8' (2") to allow a figure to stand within easily. The ceiling is not attached to make the inside playable. The door was created using a simple technique using stirrers. These happen to be Starbuck's stirrers because they are the right width and rectangular. Each door panel is cut to be 6' (1.5") in length. The interior of the door, is held with a series of four small pieces spanning across varies widths of the door. 
After priming this shack, I decided to test out a new can of Rustoleum Forged Hammered Antique Pewter ($8.66) that I picked up on a whim one day at WalMart. You can see the texture of the paint in the Base Coat Applied base. This is a primer and paint in one, so it will save you a step if you go this route. 

The weathering of the tin sheet was accomplished by mixing some Vallejo Model Color Light Grey areas and some Reaper MSP HD Dirty Grey spread around different areas. Some areas of rust were added using Anita's Metallic Tin Roof Rust. You can see this on the roof and some streaked areas on the front. Washes of Vallejo Model Wash Light Grey were added for sheets to add some depth. Model Wash Dark Grey was applied in areas of overlap or where a shadow was needed. The base was painted with Delta Ceramcoat Dark Burnt Umber as a place holder until I decide how I will incorporate into other pieces. This shack may be removed and placed onto a better MDF or particle board base.

In the end this painting test mostly worked. I ended up removing most of the beaten pewter from the start, but the base color was good and could be useful for some other models. In the next, I'll try a different color base and some other fun weathering ideas and break up with some broken color areas.

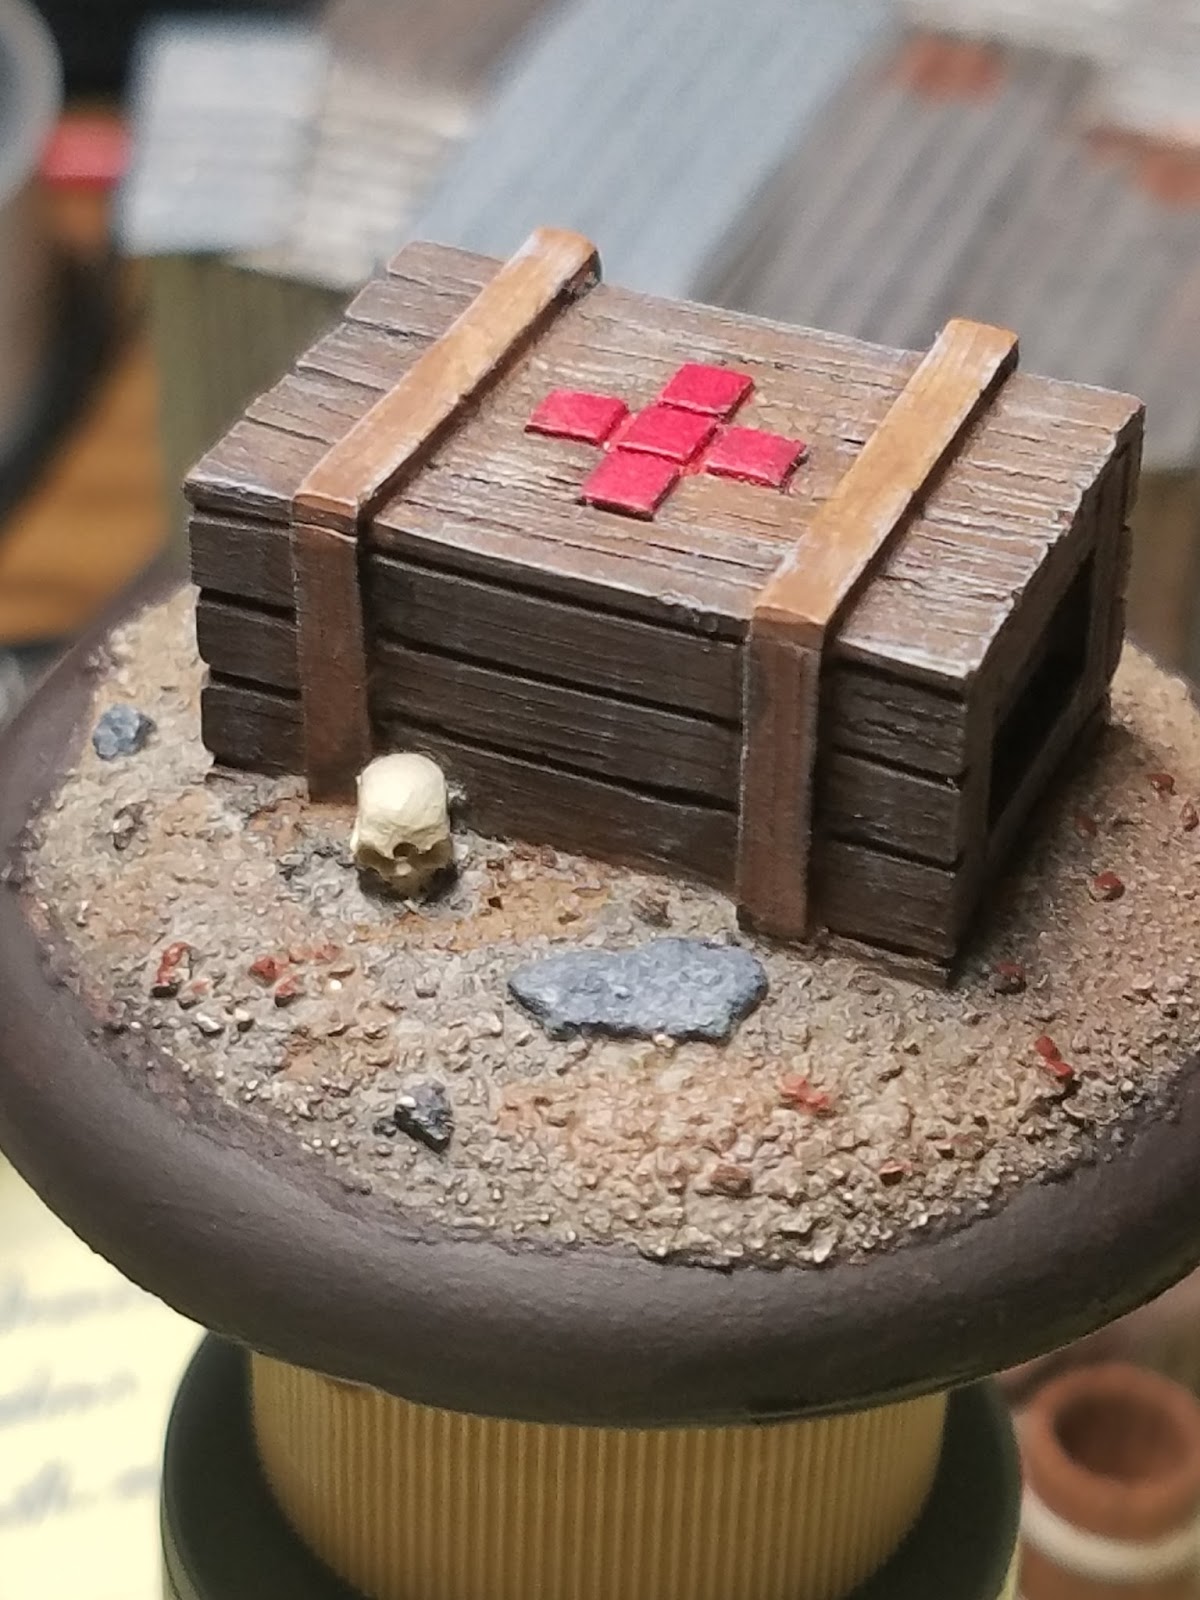
Dragon Forge Designs Medical Supply Marker

This Medical Supply Marker ($5.00) is the second of these markers that I have painted from Dragon Forge Designs. The first was a 40mm on a beveled base and covered in my Take a second to breathe...then prepare for what's next post, while this one is 50mm. As  you can plainly see, this base is a rounded lip base, which is my typical preference for all of my miniatures. For this, I did some different things. I started with a base of Citadel Calthan Brown for the box. The cross members are based with a bit of Citadel Dwarf Flesh. The cross is painted with Vallejo Model Color Flat Red. The box was washed using Vallejo Model Wash Light Grey to draw out the grain of the wood. The box was dry brushed with Model Color Light Grey to add some aging to the box. 

The base was started in Citadel Bleached Bone as was the skull, but I found it to be too light. I painted a few of the larger rocks with Model Color Ashen Grey and some of the smaller rocks with Citadel Knarlock Green. With the light base color, the skull was lost and it looked too much like a sandy area and that was not the final location I had in mind. I used a Model Wash Dark Grey which took the base much darker. This was hit with a dry brush of Dwarf Flesh to add some highlight. Back into this some small areas of Calthan Brown was added for soil and some areas of Delta Ceramcoat Dark Burnt Umber. This Dark Burnt Umber was also used to trim the base entirely. 

Mantic Games Canister

At some point a couple/few years ago, Mantic Games had an offer for some free scatter terrain pieces that could be used to support Battlezones or Star Saga. This specific one is a three canister set that is permanently attached. This piece was free, which is pretty great, but unfortunately I only have one of these. I'd love to have another 5 or 6 of them. You can now get these within the BattleZones: Sci-Fi Urban Accessories pack ($12.99).

I went with a flat color scheme with a primary color base to give it a futuristic look. The base colors are Vallejo Model Color Flat Blue and Model Color Flat Red. The top is Model Color Grey Blue. The segments are lined using Game Ink Black. The side clasps were painted with Citadel Chainmail.

Now, for use in This Is Not a Test the canisters must be beaten up some. I used Reaper MSP HD Military Grey to make some areas where the color was removed and the primer exposed. In some of these areas, some slight use of the Citadel Chainmail is used to show the bare metal.

Dragon Forge Designs Ancient Runes II Ammo Objective

The Ancient Runes II Ammo Objective ($5.00) is 40mm on a beveled base. This is a set of large ordinance shells and a smaller ammunition box on what could be an ancient tile floor space.

For the stones I wanted an aged Italian/Greek marble look. I started with Citadel Bleached Bone as a base. The marbling was added with Reaper MSP HD Tusk Ivory and Citadel Calthan Brown. I washed this with Model Wash European Dust.

For the ammunition box, I had a desire to have a RoboTech inspired box. For this I used Model Color Blue Grey for the surround to the lid and Model Color Light Grey for the rest. This made is futuristic and I think hit the color intent. Of course this would stick our for Warhammer 40K and This Is Not a Test, but I like the look.

The shells are based with FolkArt Metallic Chocolate Brown, surprising I know but I have a big bottle of this stuff left from the Command Master Sergeant statue. This was then washed down with Citadel Nuln Oil to rough it up/age it and to pick out the section lines. A couple of highlights were added using Reaper MSP HD Military Grey.

Monday, January 22, 2018

Hobby Hangout Holiday Swap

Hobby Hangout 

When the holiday swap came around this year, I immediately jumped on the opportunity. For me, this was to be a kick in the rear to get started painting again. Moving to Florida was a great thing, but at the same time has isolated me from my hobby and gaming in general. As a result, I have slowly spiraled further down until the thought of painting was horrifying. With some requirements and a deadline, I knew that I had to move forward with something and a limited amount of time to get to work. So I selected something to which I had targeted for a future Preserver or Raider warband for This Is Not A Test, but that may or may not come about and so off to a new owner. 

Miniature Selection

Mr. Pretty
I selected one of the new pieces from Brigade Games that was released from the Kickstarter campaign. The range brought a bunch of amazing figures for any wasteland needs, even some modern skirmish games. There are a number of other great products from Brigade Games, so check them out and if you like what you see then follow them on facebook.

The entire range is fantastic, but there was something great about this piece that was calling to me. I had personally names him, Mr. Pretty, though to my knowledge he has no official name. To me, Mr. Pretty makes for a perfect Lorekeeper for a Preserver warband. His dapper style, bowler hat, and topped off with a gas mask, Uzi, and walking stick. If you'd like a Mr. Pretty of your own, well you need to pick up one from the Apocalypse Wastelanders - 3 Raiders I set ($24.00).

The finished miniature was shipped off to Andrew Carter. I am hoping that Andrew is inspired to check out This Is Not A Test and start some wasteland adventures of his own. Andrew made a vlog entry about the miniature and you can find it on his Artimage YouTube channel

Painting Process

Mr. Pretty (front)
Though scrounging for his wares in a post-apocalyptic wasteland, Mr. Pretty is always sure to be well appointed and presentable. I started with the bowler hat. I know that makes no sense, but that's where I started. I went with Vallejo Model Color Grey Black then used the Light Grey to give it a worn look. The band is Citadel Bleached Bone to match the shirt. It is important to be color coordinated.

The shirt, an impressive Citadel Bleached Bone with French cuffs provides elegance and a sense of status. Looking at the cut of the bottom, it appears that Mr. Pretty has optioned a shirt from the new Untuct line. This was washed with some Vallejo Flesh Wash to give it a bit of depth and a little of the worn appearance.

How Mr. Pretty keeps such well-pressed (and stain free) pants is a matter for another post, but clearly indicates his prowess and power. These were painted up with Model Color Blue Grey with a Model Wash Light Grey wash. Highlighting with the Light Grey helped tie it all together.
Mr. Pretty (rear)
Now, no wastelander could be considered well-equipped without a gas mask and some steel plating. The gas mask was the same black grey with a Vallejo Dark Grey Model Wash. The lenses are Vallejo Model Color Blue Grey with Folk Art Metallic Chocolate Brown rims. Now, the color for the Folk Art paint was great, but the thickness leaves quite a bit to be desired. It was perfect for fixing the Master Command Sergeant Statue, but took some work for miniature painting.

The base is round lip 30mm resin base from the Cobblestone 30MM set ($11.99 for 10) from Secret Weapon Miniatures. The cobbles on the street were painted using a couple of varieties of greys (Reaper Concrete Grey and Model Color Light Grey) and washes (Vallejo European Dust and Brown Wash). The brick surround for the sewer cover were done with Model Color Flat Red with a few layers of wash. The sewer cover was painted using the Folk Art Metallic Chocolate Brown washed with Model Color Dark Rust.

The gun was first painted with Anita's Metallic Craft Paint - Tin Roof Rust and then some washes of Nuln Oil applied. The non-metallic parts were painted with Model Color Black Grey. The holster, bags, and straps were painted using Army Painter Leader Brown and Citadel Snakebite Leather.

My Gift

Wasteland Melee (front)
I received a wonderfully painted Wasteland Melee ($9.99) from Bombshell Miniatures. I happen to be also working on my version of this same miniature, but this is great. A very natural looking Melee done in earth tones and looking well fit appropriately dusty. This fantastic paint job was done by Ken Horton of the Battle Badgers club.

Wasteland Melee (rear)
I don't know much about this base though it is a really great piece. The wrench really seems to pop out to me and the look of one that would be in a set.

This figure will go great with a larger project to which I am every so slowly working to complete. Part of that will require getting over a fear of using my air brush. I am hopeful that I can conquer that soon with my garage remodel. In that Wasteland Melee will be appropriately set-up with her Rocket Fuel Gas Station and Service Shop. It will be complete with Ice Machine, Soda Vending, Gas Pumps, Rocket Bike Repair...everything you need to explore the wastes.

Upcoming

Since I've been getting back into this a bit slowly, I'll be working on a bunch of markers and small pieces that I have received or acquired for scenery stuff. Then the plan is to complete some started pieces and move onto a few characters for the kids for our D&D campaign.

Friday, January 5, 2018

A Call to Arms

When a veteran calls...answer.

Flag damage
Recently, a colleague had the misfortune of some significant damage done to a statue of his. Command Master Sergeant Louis Barnes thought his retirement statue would be safe, but a strong gust of wind and down it tumbled off of his desk. This statue seemed heavy, but it turns out that all of the weight was in the wood base, so when the wind picked up; down went the statue to a crashing disaster.

Lou and I were, at the time, colleagues at Metters, Inc. which is now unfortunately closed (Lou is starting a new security company Barnes Security Solutions, LLC if you need assistance in the Orlando, FL area). Lou had originally asked our model shop lead if he could be of assistance, but was redirected to me given my hobby of small toy soldiers. Now Lou's soldier statue stands about 18" high all told, so a far cry from the 1" figures I usually manage.

Damage Done

Base damage
When Lou approached me, I was nervous to agree and so asked him to bring it into the office so that I could take a look at the damage. I am no sculptor and by no means a professional. Lou had attempted a self-repair, but could not get all of the little bits reattached and the gaps filled.

Foot damage
The biggest concerns for me were the damage to the flag. This was a pretty significant gap and a number of large cracks running up and down the flag. The access the parts of the flag that were damaged were obstructed by the head of the statue.

The other concern was the damage to the foot. This was mainly a concern because it was a more complex area with the laces and boot sections. The gap, while relatively small, was combined with a crack that went from one side to the other then across the front to the toe. The crack was thin and already glued back together so fixing that area was concerning.

Flag damage
The least of the concerns was the damage to the base. This overall was the least complex. It was a rather flat area with some scratch marks within the general area. The area was large, but all in all seemed like a pretty straight forward correction. The only potential concern would be the adherence of the materials to the base.

The statue is made of plaster, so the material was not too much of a concern. The larger issue was the paints. As I stated pretty clearly, I am colorblind so I had a significant concern with selecting the correct colors to match the under color and the and the bronzing. This was after some especially difficult times at Metters with work on one of the military trainers where we had a major issue with the customers original selection for a copper pipe versus what would actually be seen in the real world.

Healing Process

Reporting for duty
After the review of the statue in person, I decided to give it a go. The alternative was for Lou to ship it off to someone at an exorbitant rate to get fixed. I was fairly confident that I would be able to restore it to a more than fair condition and set it right back to Lou.

I started with the easiest first, the base. This was to get the mix of plaster (Merlin's ) correct and to gets my hands dirty again with the plaster. Once I had the mix right, I was able to apply using my dental picks. These were the perfect tools to work the plaster. After filling in the space, it was a matter of letting the plaster dry a bit and then marking it to look much like the other scratches.

Firm base support
With the work on the base done, I moved onto the boots. The hole filling was pretty easy, but then the next step was the work on the boots. This made me a bit more nervous with the laces. The hole was pretty easy to correct, but the crack through the laces needed a little more work. I managed to get most of the crack filled with a little texture work to make the laces match. The repair work previously done made the crack hard to conceal entirely, but I managed to get enough plaster around it to make it shelf worthy. The repair wasn't perfect, but it was concealed enough so as not to notice from more than a foot away. There was one area of the boot that needed a little more touch up following the plaster work, and for that I needed a little more of a pliable material and used some Gale Force 9 green stuff. This allowed me to work the material into a small space without affecting the boot surrounding.

The flag being the most difficult, was saved for last. I started with some plaster work to fill the largest of the gaps. The size of the space and the empty space within the statue made for some shrinkage. I had to go back with a second set of plaster after the first batch had dried. This didn't address all of the issues though and a significant crack remained along the fold of the flag nearest to the statues head.

Flag bearer
For this area, I had to do some work with the green stuff. The crack needed a few goes to get the length filled with green stuff and then worked flat. The overall result was a rather seamless set of joints in the flag, base, and the boots. The crack was slightly visible with close inspection, but not much else could be done for it.

The paint match, my personal biggest challenge, took much more time than the fixes to plaster and cracks. After going through every paint that I had for my tiny soldier painting, I starting going through the color ranges of Reaper, Vallejo, and P3. My search was fruitless. I spent the better part of 3 weeks looking at paints online, at Walmart, Target, Lowe's, Michael's. Pretty much at any location where I could see paints. Finally with a trip to Hobby Lobby for some Christmas decorations with my wife and the Command Master Sergeant statue in tow, she was able to help me find a match.

Bearer of Arms 
With a large selection of craft paints, she narrowed to a few options. The final selection for the matching base color was Folk Art Acrylic Cocoa (6498) and for the bronzing, Metallic Chocolate Brown (2570). I applied the Cocoa with a brush, Windsor and Newton Series 7 #2. For the bronzing, I would add with a brush to the high point and then rub it onto the statue with my finger. This seemed to allow me to hit the high points with the bronzing color without running into a channel. Overall, the statue turned out quite well and my wife and kids did the primary QC for me.

The other day, I got to meet up with Lou and discuss how things were and present to him the Command Master Sergeant statue once again. He was thrilled and hopefully it will complete his home office. I am glad I was able to do a small bit of good for Lou, who did so much for our country over his career with the Army.

Wednesday, August 17, 2016

Walk softly and carry a big stick

Line Breaker Model

This Is Not A Test Line Breaker


Whether you are facing a bunch of hippies at a sit in or fending off mutant cannibals, you don't want to on the the receiving end of the Line Breaker's baton. The Line Breaker ($6.50) is the latest of the Peacekeeper warband in the NOVA Open Charitable Foundation Silent Auction.

I went slightly different with this model. Since the Maryland State Police wear camouflage uniforms for the special weapons and tactical teams, I went with more of a Baltimore feel for the model.

Maryland Flag Visor
The Baltimore SWAT units are equipped with practical equipment, the Line Breaker is ready to punish with a spiked club and a spiked, full-body shield. Both at the ready to smash his opponents. When holding the line, his tactical riot armor will help defend equally from knife sticks and small arms fire.

Since I was going with a real city feel, I went with a round lipped 30 mm sewer base from Town Square set ($10) offered by Secret Weapon Miniatures. I think one was a part of the NOVA Open 2015 swag bag.

Line Breaker (front)
While finishing up a previous model on one of the Hobby Hangouts, we were discussing freehand technique. For some reason while discussing freehand techniques for the trim of capes or the back of the capes, I decided that I needed to do a Maryland State flag ...and I needed to paint it on the visor. Now I am not sure how this officer can see out of the visor, but with a big spiky club; he may not care. The Maryland state flag colors are red, white, and black. The flag is the heraldic of George Calvert, Lord Baltimore. I tried to match the layout in style since the visor isn't rectangular and made it as close as possible. When the model was done, I used the Army Painter Anti-Shine to take it to a matte finish.

The base color for his uniform pants and shirt are based with Vallejo Blue then washed with the Vallejo Blue Shade. This took the flat blue to a more navy color like the S.W.A.T. uniforms.

Line Breaker (Shield)
The riot armor has the feel of a catcher's breast plate in texture, so I went with a pretty safe layout for that. The base was the Vallejo Black Grey. To get it darkened up, I used the Secret Weapon Soft Body Black wash. Though this is a wash, it covers pretty well and it rather opaque. The wash doesn't run off as readily as many other washes so I had to do a touch up on top with the Black Grey. The straps for the armor were done with Vallejo Black. His badge is a duel layer of Citadel Boltgun Metal with the star done with Citadel Shining Gold. The shoulder pads and the little protective pads on the gloves were painted with Reaper Military Grey. The gloves are painted Vallejo Leather Brown.

Line Breaker (Rear)
Most riot shields are either black or very dark grey. I went with a the black grey, but mixed in some of the soft body black wash with some bolt gun metal to give it a little shimmer. The mix provide some slight sparkle to the shield, but doesn't make it shimmer or take it too far from a flat metal look. The spikes on the front are painted with the Vallejo Boltgun Metal. The helmet is reaper Nightmare Black, which has a heavy purple base to it.

The sewer cover was based with the black grey and then touched over with Vallejo Tinny Tin. The tinny tin was added sporadically to give some low cover shimmery effect and a bit of the metallic rust color. On top of this was added some of the Secret Weapon Pigments (entire set of 23 for $99). I used a combination of Ancient Earth, Dark Earth, and Clay Earth. This was of course fixed with the Secret Weapon Pigment Fixer. This doesn't show up much int he image as the fixer was still wet. It will brighten up a bit when dried completely. You can see that at the NOVA Open in a couple of weeks.

Wednesday, August 10, 2016

Role-call Lt. Strong

This Is Not A Test Peacekeepers

Peacekeepers
When the Road Marshal starts role-call, his go to second in command is Lt. Stong. He is the Road Marshal's Quartermaster and there to keep the troopers in line and on point. After many years on the force he knows the units, knows the procedures, and knows the gear. Ready to tear a weapon down and reassemble at a moment's notice, Lt. Strong is the most dependable of this veteran force.

Armed with an AR-15 capable of fully automated fire, the good lieutenant is ready for action. As with every good Quartermaster, he is not concerned with the performance of the weapon because he treats it better than his lady. 

Lt. Strong (Front)
The Quartermaster is decked out in the standard Stetson straw hat and Maryland State Police (MSP) winter coat. The hat was painted with a base of Vallejo Khaki Grey with a highlight of Vallejo Khaki. This Khaki was carried down to his shirt as well. The heavy coat follows with the MSP Olive Drab. Highlights were applied with a Reaper HD Stained Olive and Golden Olive. All of the buttons were done in Citadel Beaten Copper to match the theme and style of the Road Marshal. As with Road Marshal, the Quartermaster has pants of painted with Army Painter Leather Brown. His gloves and the scabbard for his knife are painted using Citadel Snakebite Leather. 

Unlike the Road Marshal, standard colored chaps were not available, so he got some Harley Davidson stock chaps and modified them for duty. These are matched by his Harley Davidson riding boots, nicely accented with silver spurs. The chaps and boots were base coated with Vallejo Black Grey. The chaps were washed with Vallejo charcoal grey extra opaque and deepened with Secret Weapon Miniatures soft body black. 

Lt. Strong (Side)
The AR-15 was painted with the black grey, they washed in small spaces with the Vallejo Dark Grey Wash. Some wear marks were added using Citadel boltgun metal. The ammo pouches on his belt were done with the black grey with beaten copper buttons. The beaten copper was carried tot he ammunition belt across his chest. All of the armor and pads were painted using the black grey with a cover of Reaper Military Grey to provide some contrast.

The model was based on a Dragon Forge Designs 30 mm Round Lip Concrete Finish base. This is a few layers of paint and washes. The base color is Reaper Ash Grey. The areas between the slabs were washed with Vallejo Dark Grey Wash and then brought back up with Reaper Ash Grey.

If you want to see this one and take it home, be sure to check it out at NOVA Open and bid on the warband in the NOVA Open Charitable Foundation Silent Auction

Wednesday, August 3, 2016

Hell hath no fury...

Like a Woman Scorned

Agatha Fox (front)
As part of the Reaper Bone Kickstarters, I picked up hundreds of miniatures and many of those are still sitting around collecting dust. With my involvement with This Is Not A Test, I have found a new use for many of the miniatures. Originally I picked them up for all of the fantasy figures for use with on-going D&D campaigns. Well a couple of years later, some parts from the Bombshell Couterblast Kickstarter and inspiration strikes.

I started with the Agatha Fox Bones miniature ($2.49) and made a little modification. The original figure is a peaceable enough looking woman, but with a secret, she is a spy after all. Tucked up behind her purse is what appears to be a Walther PPK (think Bond, Jane Bond).

Now while this is a fine enough figure and has been painted by many rather good painters, I decided it needed more. I liked the pose overall, but there wasn't enough oomph in the gun and I didn't see a spy in this figure so much as I saw a woman scorned. Perhaps beaten and broken, she was seeking revenge in one final confrontation.

Agatha Fox (rear)
I selected a handgun from the Neiran Weapon sprue ($2.99) since it had a much more American six shooter look to it. I had to do a little surgery on Agatha, but since it is the Bones material that is a really simple task. The material is a sinch to cut and move around. For this, I had to slice where her right hand falls behind her purse and separate her purse from her body. I cut off what was the Walther and opened the hand so that I could add the Neiran gun into a position that keeps the profile and the gun can't be seen from the front. This is similar to the work I did for the Reaper Bones Strumpet (The road from lovely scrumpet to deadly vixen).

Once the conversion was completed, I selected one of the newer Dragon Forge Designs bases, a round lipped base from the Cobblestone Rubble 30 mm sets $10.00).

Painting

Agatha Fox (Front)
I tried to keep a rather domestic look to the figure to keep with the basic idea that she is meeting up with a lover/husband and exact her revenge. She has a very fair complexion, Reaper MSP Maiden Flesh. The hair is a base of Vallejo Mahogany Brown with highlights of of Reaper MSP Griffon Tan. A wash of Vallejo Flash Wash was used to mark the line from the hair to the skin. 

The coat is based with Vallejo Khaki Grey with the Flesh Wash to add depth. The lapels were painted with straight Khai Grey. To finish off the coat, the belt was painted Mahogany Brown with a Citadel Shining Gold buckle. 

The gold carries to the purse which also has gold buckles on a Vallejo Flat Blue base. This was mottled with a Vallejo Grey Blue after a Vallejo Blue wash to give it a color similar to a Coach purse my wife has. When originally done though, the blue was too predominant and drew attention away from the face of the model. I increased the layer of blue grey and that toned it down significantly. For some additional consistency, she was given Mahogany Brown boots to complete her outfit. My thanks to some friends in the Facebook #HobbyHangout group for helping with feedback and color choices for the belt and boots. 

Agatha Fox (Rear)
The base was coated with Reaper MSP Ash Grey then some color was added to a few of the cobblestones using the Grey Blue. The highlight color was Reaper Concrete Grey. The sewer grate was painted with a base of Citadel Boltgun Metal which was then covered/washed with Vallejo Black Grey. 

After finishing it up, there was still something missing that I felt was needed to give it a bit more life. Since her colors were fall in palette, I went to the Secret Weapon Miniatures Masterclass Scenics and added some Fallen Leaves to the base. These were added in a bit of a clumpy fashion but coming off of the base to give it some action, something like the leaves being blown in the wind. Something to add to the chill nature of the act about to occur. 

Sunday, July 31, 2016

Peace Officer

This Is Not A Test Peacekeeper Road Marshal

Blocked out colors
When faced with the constant attacks and chaos of the wastes, gentler folks look for peace wherever they can find it. When the Road Marshal ($6.50) brings his posse to town, they are ready to lay down the law.

The original kit from This Is Not A Test includes two weapon options, the submachine gun or a pistol. Since this is the leader for the NOVA Open Charitable Foundation Silent Auction, I decided to give him the SMG. To give him a more action intense pose, he is pointing to provide direction to his men.

Details being worked out
The original package come with two head options, one that is wearing a helmet with a gas mask and one that is totally open with mutton chops. I decided that the scheme for this warband would be close related to the Maryland State Police (MSP) Troopers since they are coming from the National Capital Area. To make this work, I selected one of the heads with the straw Stetson hat as worn by the MSP.

To get the hat color I started with the Vallejo Khaki Grey and then added some highlight with straight Vallejo Khaki. The highlights are along the ridges of the top of the hat and along the front brim of the hat. Along the front brim of the had, I extended the highlight back a bit more to bring the focus toward the face.

Final (front)
For the face, I wanted to show him as well exposed to the sun, so I went with the Reaper Sunburned Flesh as the base. I added some touch up to this with Reaper Caucasian Flesh. His hair started with Reaper Concrete Grey that was washed with Vallejo Flesh Wash to give it some added brown to the hair.

The traditional colors of the MSP are Olive Drab winter coats, khaki shirts, with brown pants with a black stripe. Now, the Vallejo Model Color USA Olive Drab worked really well with this figure and I used the Vallejo Stained Olive to deepen the contrast on the coat. The turned section is done up with Vallejo Golden Olive to make a stark contrast with the exterior of the coat and lighten up toward the face. The shirt is done with the Vallejo Khaki paint with the belts painted with Vallejo Gunmetal Grey. The center section and all of the rivets, buttons, and buckles were painted with Citadel Beaten Copper.
Final (Side)

The belts that are on the exterior of the coats and the chaps and belt pouches were started with Vallejo Black Grey. To deepen this, I used Vallejo Game Exta Opaque Heavy Charcoal watered down to be a wash. Usually I would highlight with a lighter grey as well to bring show wear and add highlight, but I left the bottom half darker to keep focus moving up the face. The small area where the pants can be seen was painted up with Army Painter Leather Brown. That was washed with the Game Color Flesh Wash.

Final (back)
The SMG was based with the black grey and then touched in a few spots with Vallejo Game Ink Black. The boots were painted strictly with the Heavy Charcoal.

The base is a Dragon Forge Design 30 mm Round Lip Concrete Finish base. This is a few layers of paint and washes. The base color is Reaper Ash Grey with touch up of Reaper Concrete grey for the highlight/wear locations. The areas between the slabs were washed with Vallejo European Dust, Vallejo Light Grey Wash, and Devlan Mud.

Be sure to check out the final set when it gets to NOVA Open this September.

Sunday, July 10, 2016

You can Depend-O-Bot on me!

This Is Not A Test Depend-O-Bot


Blocked colors
Keeping the peace sometimes requires a carrot and sometimes it requires a stick. When the Peacekeepers need a really big stick, they call in the Depend-O-Bot. Created just prior to the Great Fall, the Depend-O-Bot was the latest and greatest in the unmanned fighting force. Able to run efficiently on any available fuel, the Depend-O-Bot is a rugged and robust machine of destruction.


 The Depend-O-Bot ($6.50) provides an assured level of protection for a reasonable amount of barter script. The issue is more about finding a working Depend-O-Bot in the midst of piles and piles of rubble. Once it is found, getting it in working order can be an ordeal.

All of that stress and trouble is well worth the price when the bullets are flying or engaged in close combat. The capability to have an integral weapon allows the Depend-O-Bot to be equipped with a two-handed melee weapon as well as a ranged weapon. The additional armor keeps it running through whatever the enemy forces can throw at you.

Factory Paint

Depend-O-Bots were produced for military and civilian purposes. I chose a civilian outfitted model with a police style paint scheme. I blocked out the figure with Vallejo Model Color Flat Blue. I graduated the armor plating using a Vallejo White and Vallejo Light Gray blend. I started with an even mix for the first level and then slowly added more white to the mix to bring it up.

For all of the components of tubes, I used a mix of Vallejo Gunmetal Grey and Vallejo Black Grey. There a few sets of pipes along the neckline and going to his weapon and for the joints at the hips and back of the knees. The gun is a base of Vallejo Gunmetal Grey with an ammo feed of Citadel Game Colour Beaten Copper.

Most of the model was washed with Vallejo Dark Grey, mostly in the recesses. Some Citadel Boltgun metal was used to make some sections of wear to the model. I over painted the wear marks, then went back with the Vallejo Flat Blue and stippled it in to break up the wear marks.

Finished Depend-O-Bot
The "eye" was done with a base of Vallejo Flat Red which was followed with a lighter area of mixed Reaper Sunrise Orange with the Vallejo Flat Red. This didn't have enough of a pop to it though, so I added a center spot of Reaper Candlelight Yellow. To add some rusting to the body, I layered some wash with the Vallejo Dark Rust.


I based the miniature on a Secret Weapon Miniatures 30 mm round sewer base which I got as part of a swag bag from the NOVA Open. You can get it as part of the Town Square set ($10.00). This was painted up with the Vallejo Grey Black then highlighted with Citadel Game Colour Tin Bitz and washed with Vallejo Dark Grey and Vallejo European Dust.

This will be one of the Peacekeeper sets that will be part of the silent auction at NOVA Open this year, so stay tuned as the Peacekeepers get put together and painted up.

Saturday, July 2, 2016

Not all Roaches are bad, some are Rad!

This Is Not A Test Rad Roach


Rad Roach (primed)
You can count on two things surviving the apocalypse. One is goo filled and leads to an early grave, the other is the cockroach. Once you just needed to get past the ick factor and put a boot onto them, but those days are long past.

Creatures of the darkness, scavengers of carrion, and opportunists to attack unsuspecting wastelanders. The Rad Roach ($6.50 for 1 or a swarm of 5 for $29.50)  a far surpassed survival. Thriving on a study diet of the detritus of the wasteland, the Rad Roach has adapted to tolerate high levels of radiation, either from direct exposure or bio accumulation.

Much as in days of the past, the Rad Roach is a nuisance in the wastes. And much like the days of the past where there is one Rad Roach there are many. Unlike days of the past, these will take down a herd of cows (or Caravanners) and clean the bones in a day.

Initial complete phase

Rad Roach Painting

 For this version of the Rad Roach, I decided to base it on an actual cockroach. Unfortunately, I am color blind (protan if you are interested) and I didn't have a direct match to the colors I wanted to use. I decided to mix up something that might work enough for what I needed and started to paint.

The main body of the Rad Roach was created by mixing Reaper HD Sunburn Flesh with Reaper HD Sunrise Orange and Vallejo Mahogany in a 6:1:4 ratio. To bring the color up, I added 1 drop each of Vallejo Candlelight Yellow and Sunrise Orange tot he remaining paint. I continued to bring the contrast up by repeating this step another time. With the layers of color added, the entire model was washed down with Devlan Mud. A round of touch ups to clean up the wash layer. Six additional drops of of the Candlelight Yellow to the remaining paint mixture and the final touch up for highlights.

Final model
With this base color applied, the roach that I selected had a highlighted color on the top of the carapace and on the legs. The actual roach's highlights were amber, an amber that I didn't have. I went with a bit of a wilder decision. I went with some Citadel Ivandian Darksun for the face, topmost carapace, and spiny protrusions.

Final Model
This gave me something that wasn't quite right, but I could not put my finger on exactly where I needed to make changes. I went to the Hobby Hangout Facebook group and solicited some advice. I was given suggestions to add some banding to the antenna, ink the lines, and bring the highlight color (Ivandian Darksun) up more. I used Game Ink Black to do the lining. I used another layer of the Ivandian Darksun to add the bands and the carapace highlights.