Showing posts with label Bombshell Miniatures. Show all posts

Thursday, February 22, 2018

A cozy place to lay your head...

Retro Chic 80's Hardwood Sofa

Too clean for the wasteland
This is a quick post of a sofa that was inspired by the great Jessica Rich who showed the basement of her camper in some online game. That basement is 80's themed and had a great hardwood sided sofa within it. It reminded me of one that we had when I was a kid. Hated that thing, uncomfortable and we'd run into it constantly. Terrible idea for furniture.

Well, it seemed only appropriate that a big dangerous hunk of wood furniture would survive everything and show up in your neighborhood wasteland setting for This Is Not a Test. So here is my take on that offensive (read that both ways) furniture.

The wood is painted up with the Delta Creative Ceramcoat Drk Burnt Umber with a wash of Citadel Devlan Mud and Vallejo Model Wash Brown. The cushions are painted with Reaper MSP HD Tusk Ivory and washed with Devlan Mud, Vallejo Model Wash Tierra European Dust, and Game Color Flesh Wash. Some stops were also hit with Reaper MSP HD Maiden Flesh.

Archie's Big Comfortable Chair

 While this isn't the real model of Archie Bunker's chair, that had a bunch of plaid I believe. One of the 2018 Painting Bingo Challenge for Model's Workshop is to "Find a reference picture and try to copy it for a mini". So I started doing some searching for chairs and then wanted to follow that up for a wasteland chair. I found an image and copied the look of this oversized chair (don't worry this is not an entry for the bingo, just an inspiration). Then I started to add wear marks on the chair, with the idea that this was well worn and somehow didn't catch fire in the fallout.

The chair is painted up with a base of Vallejo Model Color Flat Blue with some depth added using Citadel Enchanted Blue. The wear coloring is a combination of Model Color Grey Blue and Vallejo Game Color Glacier Blue.

Now these are far too large for any of the wasteland shacks, but as a scatter piece they are fun and potentially moveable in the wasteland. Perhaps some quick rules are necessary for release.

Modeler

For anyone following the Geek in the Basement blog, then you know the power of converting trash to treasures. Both of these piece, though sculpted originals, came from the great mind you may know as Geeky McBasement. This is a wonderful little set of scatter terrain that will work perfectly in the wastes. 

Here is a shot of the couch (for scale) with the Bombshell Wasteland Melee that I received and posted about before.

Monday, January 22, 2018

Hobby Hangout Holiday Swap

Hobby Hangout 

When the holiday swap came around this year, I immediately jumped on the opportunity. For me, this was to be a kick in the rear to get started painting again. Moving to Florida was a great thing, but at the same time has isolated me from my hobby and gaming in general. As a result, I have slowly spiraled further down until the thought of painting was horrifying. With some requirements and a deadline, I knew that I had to move forward with something and a limited amount of time to get to work. So I selected something to which I had targeted for a future Preserver or Raider warband for This Is Not A Test, but that may or may not come about and so off to a new owner. 

Miniature Selection

Mr. Pretty
I selected one of the new pieces from Brigade Games that was released from the Kickstarter campaign. The range brought a bunch of amazing figures for any wasteland needs, even some modern skirmish games. There are a number of other great products from Brigade Games, so check them out and if you like what you see then follow them on facebook.

The entire range is fantastic, but there was something great about this piece that was calling to me. I had personally names him, Mr. Pretty, though to my knowledge he has no official name. To me, Mr. Pretty makes for a perfect Lorekeeper for a Preserver warband. His dapper style, bowler hat, and topped off with a gas mask, Uzi, and walking stick. If you'd like a Mr. Pretty of your own, well you need to pick up one from the Apocalypse Wastelanders - 3 Raiders I set ($24.00).

The finished miniature was shipped off to Andrew Carter. I am hoping that Andrew is inspired to check out This Is Not A Test and start some wasteland adventures of his own. Andrew made a vlog entry about the miniature and you can find it on his Artimage YouTube channel

Painting Process

Mr. Pretty (front)
Though scrounging for his wares in a post-apocalyptic wasteland, Mr. Pretty is always sure to be well appointed and presentable. I started with the bowler hat. I know that makes no sense, but that's where I started. I went with Vallejo Model Color Grey Black then used the Light Grey to give it a worn look. The band is Citadel Bleached Bone to match the shirt. It is important to be color coordinated.

The shirt, an impressive Citadel Bleached Bone with French cuffs provides elegance and a sense of status. Looking at the cut of the bottom, it appears that Mr. Pretty has optioned a shirt from the new Untuct line. This was washed with some Vallejo Flesh Wash to give it a bit of depth and a little of the worn appearance.

How Mr. Pretty keeps such well-pressed (and stain free) pants is a matter for another post, but clearly indicates his prowess and power. These were painted up with Model Color Blue Grey with a Model Wash Light Grey wash. Highlighting with the Light Grey helped tie it all together.
Mr. Pretty (rear)
Now, no wastelander could be considered well-equipped without a gas mask and some steel plating. The gas mask was the same black grey with a Vallejo Dark Grey Model Wash. The lenses are Vallejo Model Color Blue Grey with Folk Art Metallic Chocolate Brown rims. Now, the color for the Folk Art paint was great, but the thickness leaves quite a bit to be desired. It was perfect for fixing the Master Command Sergeant Statue, but took some work for miniature painting.

The base is round lip 30mm resin base from the Cobblestone 30MM set ($11.99 for 10) from Secret Weapon Miniatures. The cobbles on the street were painted using a couple of varieties of greys (Reaper Concrete Grey and Model Color Light Grey) and washes (Vallejo European Dust and Brown Wash). The brick surround for the sewer cover were done with Model Color Flat Red with a few layers of wash. The sewer cover was painted using the Folk Art Metallic Chocolate Brown washed with Model Color Dark Rust.

The gun was first painted with Anita's Metallic Craft Paint - Tin Roof Rust and then some washes of Nuln Oil applied. The non-metallic parts were painted with Model Color Black Grey. The holster, bags, and straps were painted using Army Painter Leader Brown and Citadel Snakebite Leather.

My Gift

Wasteland Melee (front)
I received a wonderfully painted Wasteland Melee ($9.99) from Bombshell Miniatures. I happen to be also working on my version of this same miniature, but this is great. A very natural looking Melee done in earth tones and looking well fit appropriately dusty. This fantastic paint job was done by Ken Horton of the Battle Badgers club.

Wasteland Melee (rear)
I don't know much about this base though it is a really great piece. The wrench really seems to pop out to me and the look of one that would be in a set.

This figure will go great with a larger project to which I am every so slowly working to complete. Part of that will require getting over a fear of using my air brush. I am hopeful that I can conquer that soon with my garage remodel. In that Wasteland Melee will be appropriately set-up with her Rocket Fuel Gas Station and Service Shop. It will be complete with Ice Machine, Soda Vending, Gas Pumps, Rocket Bike Repair...everything you need to explore the wastes.

Upcoming

Since I've been getting back into this a bit slowly, I'll be working on a bunch of markers and small pieces that I have received or acquired for scenery stuff. Then the plan is to complete some started pieces and move onto a few characters for the kids for our D&D campaign.

Sunday, September 11, 2016

The eyes have it


Photo 1 - in process

Life as a color blind painter


Being color blind is a strange thing. While it isn't a full disability, it has prevented me from pursuing certain careers of interest in the past since it is an automatic disqualifier. Now, I don't think of colorblindness as anything other than it is a part of me and definitely not a disability. So long ago (about 25 years ago), I started playing Dungeons and Dragons with some friends and as part of that we decided to paint up some miniatures for our games. Sure everyone does that, but as I now know, there are specific items that I did differently from others.

Sure the materials we were using were crap. We used Tester model paints, whatever brushes we could find, and low quality miniatures. As time went on, we discovered better paints, brushes, and miniatures and slowly self-taught ourselves some minor skills. One thing that I always had to do, was to ask about the colors. I remember having concepts in my head about colors, but would (and at times still do) have to ask someone to identify the colors and help me match some of those to the concepts I had.

Photo 1 - in process (B&W)
As I have learned now, I have protan color blindness and as a result have difficulty with red-green differentiation. I'm not going to go into all of the details of colorblindness, but if you would like to learn more then you can see the color blindness Wikipedia page. This also means that I have difficulty with blues and purples and other things, all pretty helpful when you want to translate reality onto a painted miniature. Now add to that issue that I have no formal training and here I am.

So what is there to help if you are color blind. Well one great tool that I have is a color wheel. I picked up from Ironheart Artisans when I went to AdeptiCon a couple of years ago. This is great because it provides for determining complementary colors and opposing colors, but also helps identify the colors of shadows and highlights.

Photo 2 - revised in-process
The next really helpful things has been the ColourWise Facebook group. This was started by Shoshie Bauer and Morgan Brebner and has brought cohort of color blind miniature painters with non-color blind painters together. It has been a great resource for sharing miniatures, getting feedback, and sharing techniques.

This takes me to why I am writing this post. I am working on the Reaper Bones Cloud Giantess ($6.99), which was sculpted by the great Patrick Keith of Bombshell Miniatures, right now and though I didn't get it done in time for the quarterly painting contest, it is helping me push to do something new post-NOVA Open. I have included some images that come from the work I am doing and though when it is done will share a better set of images and write-up, these are helpful to discuss. One of the issues with being color blind, which I have just really learned is that contrast is a significant issue. This is because color blind people see less contrast. As a result the models we produce are missing contrast.

Photo 2 - revised in-process (B&W)
One tool that the group shared with me is to use a black and white photo to see the contrast as a proxy and then develop the shadows and highlights. I've included four images within this post. Two color images and then two black and white versions of the same images. Now, the level of contrast is something that I regularly think about and was actively working to make the contrast match what normal color seeing people would do, but even after all of that work it is apparent in the first photo that I was not able to achieve that. Thankfully the group took a look and provided the great black and white photo trick. From that I was able to deepen the shadows to provide some additional contrast and brighten the highlights to do the same. Now it isn't finished yet, but is getting very close and will be ready for the next post.

Wednesday, August 3, 2016

Hell hath no fury...

Like a Woman Scorned

Agatha Fox (front)
As part of the Reaper Bone Kickstarters, I picked up hundreds of miniatures and many of those are still sitting around collecting dust. With my involvement with This Is Not A Test, I have found a new use for many of the miniatures. Originally I picked them up for all of the fantasy figures for use with on-going D&D campaigns. Well a couple of years later, some parts from the Bombshell Couterblast Kickstarter and inspiration strikes.

I started with the Agatha Fox Bones miniature ($2.49) and made a little modification. The original figure is a peaceable enough looking woman, but with a secret, she is a spy after all. Tucked up behind her purse is what appears to be a Walther PPK (think Bond, Jane Bond).

Now while this is a fine enough figure and has been painted by many rather good painters, I decided it needed more. I liked the pose overall, but there wasn't enough oomph in the gun and I didn't see a spy in this figure so much as I saw a woman scorned. Perhaps beaten and broken, she was seeking revenge in one final confrontation.

Agatha Fox (rear)
I selected a handgun from the Neiran Weapon sprue ($2.99) since it had a much more American six shooter look to it. I had to do a little surgery on Agatha, but since it is the Bones material that is a really simple task. The material is a sinch to cut and move around. For this, I had to slice where her right hand falls behind her purse and separate her purse from her body. I cut off what was the Walther and opened the hand so that I could add the Neiran gun into a position that keeps the profile and the gun can't be seen from the front. This is similar to the work I did for the Reaper Bones Strumpet (The road from lovely scrumpet to deadly vixen).

Once the conversion was completed, I selected one of the newer Dragon Forge Designs bases, a round lipped base from the Cobblestone Rubble 30 mm sets $10.00).

Painting

Agatha Fox (Front)
I tried to keep a rather domestic look to the figure to keep with the basic idea that she is meeting up with a lover/husband and exact her revenge. She has a very fair complexion, Reaper MSP Maiden Flesh. The hair is a base of Vallejo Mahogany Brown with highlights of of Reaper MSP Griffon Tan. A wash of Vallejo Flash Wash was used to mark the line from the hair to the skin. 

The coat is based with Vallejo Khaki Grey with the Flesh Wash to add depth. The lapels were painted with straight Khai Grey. To finish off the coat, the belt was painted Mahogany Brown with a Citadel Shining Gold buckle. 

The gold carries to the purse which also has gold buckles on a Vallejo Flat Blue base. This was mottled with a Vallejo Grey Blue after a Vallejo Blue wash to give it a color similar to a Coach purse my wife has. When originally done though, the blue was too predominant and drew attention away from the face of the model. I increased the layer of blue grey and that toned it down significantly. For some additional consistency, she was given Mahogany Brown boots to complete her outfit. My thanks to some friends in the Facebook #HobbyHangout group for helping with feedback and color choices for the belt and boots. 

Agatha Fox (Rear)
The base was coated with Reaper MSP Ash Grey then some color was added to a few of the cobblestones using the Grey Blue. The highlight color was Reaper Concrete Grey. The sewer grate was painted with a base of Citadel Boltgun Metal which was then covered/washed with Vallejo Black Grey. 

After finishing it up, there was still something missing that I felt was needed to give it a bit more life. Since her colors were fall in palette, I went to the Secret Weapon Miniatures Masterclass Scenics and added some Fallen Leaves to the base. These were added in a bit of a clumpy fashion but coming off of the base to give it some action, something like the leaves being blown in the wind. Something to add to the chill nature of the act about to occur. 

Wednesday, December 9, 2015

I'm surrounded by scatter terrain!

Status Update - I was offline for hobby stuff for the last couple of weeks. First it was Thanksgiving which tied me up for some time at home and then some travel to see family. Because there aren't enough disruptions and stress at the holidays, we are preparing for a move from Maryland to Florida. Nice sure, but it also means we have to get the house ready for sale. To do that we painted the entirely of the interior which means I packed everything up for wall access. That took a week overall. Now we are preparing for carpet installation in the entire house, which means additional stuff gets packed and put aside. I did though with a house in ruins looking like life sized This Is Not A Test terrain surrounded by scatter terrain, I managed to assemble...

Warsen.al Scatter Terrain

MDF Sheet

I can't recall how I found this little terrain set, probably a Facebook feed ad or something, but you can pick up the Comanche Scatter Pack for $8. This is a great little kit made of laser cut MDF and plastic. There are no instructions in the kit, so it took me a few minutes to figure everything out, but for you, I took pictures. Even with my normal distractions of children and television, I had all of the pieces assembled in about 30-45 minutes. 

From this kit, you can make a plethora of scatter terrain for your board. The components when fully assembled will yield two pallets, six 55 gallon drums, two barricades, two cable wire spools, four Jerry cans, four ammo boxes, two ammo crates, and a satellite dish.

55 Gallon Drum Assembly Process
Let's start with the 55 gallon drums. The majority of the MDF is small circles and at first I couldn't figure out how they were to be used, but it turns out these are the spacers that make the body of the barrels. The plastic sheet contains the top, bottom and middle pieces which are slightly larger to give the appropriate bump outs/edges on the barrels. The picture shows in pictures the assembly, which I did using Aleene's Tacky Glue. Once assembled and dried, you will need to do some sanding to smooth out the centers of the barrel if you want a smooth uniform look. If not, you can prime and paint up. 

Assembled Pallets
Next up are the pallets. These are really pretty simple overall because there is only one way to assemble them correctly and since everything is pre-cut, it would be hard to assemble them incorrectly. One note though, the boards have pre-cut nail holes in them and you want to make sure they are pointing out. Some of the notches for the thin boards are irregular, so you may want to dry fit them before you glue them in place. I also started on with the larger boards which wasn't terrible, but in retrospect it would have been easier and more stable to start with the thin boards. 

Large Cable Wire Assembly
Similar to the barrels are the large cable wire spools. I have been looking for something like this for a while and was too lazy to create it myself. I do think though that you can do it very simply with s piece of PVC and some plasticard. I might have to try it soon.

Anyway, the components are similar with the ends made of the plastic and the filler made of the MDF discs. Now if you look closely at the picture, you will see that the discs for the spool are different than the disks for the barrels. Make sure you keep them separate to make the assembly easy. There is a small wooden cuboid which fits snugly in the square cut out in the disc. I know there is some joke about square pegs and round holes, but that is just if you screw it up. When you fit it all together than you should have the holes in the discs lined up with the holes in the ends which makes a nice tunnel through from side to side. 

Street Barricade Assembly
The two street barricades are pretty simple to figure out and assemble. The only thing that threw me was an extra end piece for the barricades, but you only need four of the five ends to build these. One pretty cool thing about the barricades is that they are marked so that you could paint them up immediately with some pattern (black/yellow or white/red) and not have to worry about too much work to get them done. 

These appear to be 5 gallon Jerry cans are three parts per can with the body being MDF and the sides made of plastic. The sides just glue onto the two sides. There is a little notch on the cans, so make sure you pay attention when you are gluing things together. These all fit on and line up very well, so it isn't much of an issue. This is more of a logistics warning. 

Once assembled these will be great additions either as stand along pieces or added to any number of tanks or small jeep like vehicles. 

If you look to the left of the Jerry can bodies on the MDF sheet, you will notice four little rectangles and I wasn't sure where they went. I looked at the image for the scatter pack a bunch of times and couldn't see anything there. But at the end of the time, I figured out that they were 4 ammo boxes and apparently no assembly necessary. In fact these aren't even included in the description of the set, so happy bonus!

Jerry Cans and Ammo Crates
The ammo crates are three pieces. The top and bottom are made of the plastic and the filler is made of MDF. The picture of the scatter pack shows four ammo crates, but the description (which is correct) indicates two ammo crates. One note to really be careful is with the handles on the crates. These are small, really small and barely attached to the crates. In face one of mine was missing, which isn't a big deal. I removed them immediately and then glued them into position. Doing this means you can change them to up or down. Down is more secure than up, so select based on how much you will use them. Other than that, the pieces just stack together. 

The two tires are made of four pieces and completely plastic. Each part has a set of nubs carved on the exterior. When all put together it makes the tread for the tires. One interior piece has the spokes for the tire and the other has is just a cog looking piece with nothing in the interior. The exterior pieces have some etching to look like the exterior of a tire, duh. So long as you have the etched pieces facing out, you can easily glue them together and be ready for prime and paint. 

Satellite Dish and Tires
The communications satellite dish is a pretty cool little piece. The entire set-up is made of plastic except for the base which is a nice little piece of MDF which would be equally suitable as a base crown. I didn't take pictures, but the base of is two pieces which slide together. You may want to glue this together first then build something else and come back when the glue sets some. There is a frame for the dish part which sort of looks like a Klingon batliff (really had to dig deep into my nerd file for that). This slides up into the leg frame and then is covered by the center panel of the dish. The wings then just glue onto the frame.

This is a great set of terrain and incredibly affordable. I am looking forward to getting it painted up and ready for the tabletop. Definitely check them out for more more pieces especially if you play Infinity, that is the majority of the offerings.

Kickstarter News


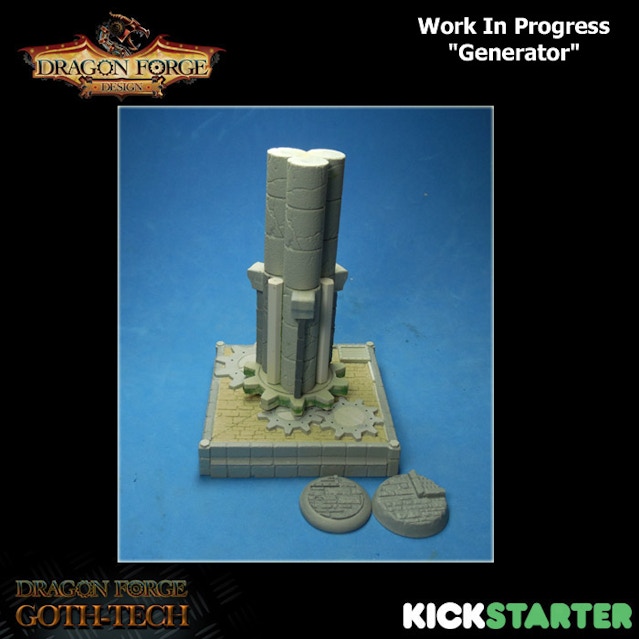
Goth-Tech "Generator"Three Kickstarter campaigns that I wanted to tell you about. The first is the latest from Dragon Forge Designs - Goth-Tech Expansion Bases and Accessories, which I mentioned previously. This has achieved funding level and unlocked a couple of stretch goals, the latest getting every a free ammunition objective marker. As I write this the campaign is about $100 dollars from unlocking stretch goal number 6 ($1800). This will unlocked another set of oval bases.  Down the road a ways is this generally named "Generator" which is in process. This is a marker or general terrain piece and stands rather large. Currently the aim for this is a $3000 stretch goal, so a little while to go. To see us there though, a bunch of other stretch goals are laid out already. If you have a tech-based army, this is a good opportunity to get in on some top-notch base sets.

The second is a cool set of Slavic Fantasy Miniatures which have been sculpted for Deraj Studios. The miniatures are 32 mm, so suitable for pretty much any tabletop campaign or RPG. The miniatures are high quality resin and based on Slavic folklore. Sculptors include Kamil Smok Milaniuk, Prezmyslaw Szymczyk, and Patrick Keith (Bombshell Miniatures). This has already doubled the original funding goal, so additional miniatures are being developed. There is a really amazing Rooster which has been hollowed out to be a home and walking about. 

These figure support a game as well, Portals: Worlds Collide which looks to allow you to bring many universes together for a table top skirmish game. 

The last on the list today is the Trash Bin Bits Part 2! campaign by Brian Roe. This is the follow-on to the previous Kickstarter campaign. In this campaign, Brian brought us another round of pretty great looking sci-fi doors/windows/covers to bring your trash bin creations to life and finish them off with style. You can see the amazing sets that are now available as high quality resin bits. These are perfect for the DIY modeller who can take cardboard packaging inserts, CD cases, and otherwise discarded materials and make some top notch sci-fi terrain. I am glad to have gotten in on this campaign and am eagerly looking forward to the materials being cast and sent to me. 

Hopefully all of this come before I move so I don't have to worry about mail/package forwarding. Anyway, keep your eyes open for more exciting Kickstarter opportunities and if you have others of interested, add them in the comments section.

Wednesday, November 18, 2015

This Is Not A Test: Marshal's Report: Search and Recovery Operations

The following are the Marshal's reports of recent occurrences of peacekeeper activity from events at or near to Games & Stuff in Glen Burnie, MD. All reports are provided directly from the surviving ranking officer and are considered accurate and true. 

Marshal's Report


Search and Recovery Target - Relic Vehicle

Unexplored Ruins - Search and Recovery

Reported by: Marshal O'Halihan
Date: October 21, 2086

Unit Details

Marshal O'Halihan
K-9 Handler Mutt
K-9 Units Dawg & Cagney
Officer Manny
Officer Flynn
Officer O'Brien
Officer Scullin

Activity Report

During some downtime in one of the regularly patrolled settlements, the Gardia were approached by a wild haired, rambling, older gentleman dressed in some sort of laboratory coat with an offer. He stated that he had located a relic, but was unable to recover the item and was looking for a group to recover the item. The item, a relic vehicle of some import, was located about 2 km to the west on a long-abandoned small town main street. Marshal O'Halihan agreed on a price and accepted a contract from the gentleman.

Mutants pressing through the ruins
Because of the number of buildings located in the area, Marshal O'Halihan utilized a spread formation to approach from two separate directions. Sniper Manny, Officer O'Brien, and Officer Scullin approached from the northeast corner. Manny had previously scouted out a ruined building that he could use to provide support fire so the officers could approach and secure the relic.

At the same time, Marshal O'Halihan approached from a small copse of trees on some small hillocks with K-9 Handler Mutt and K-9 units, Dawg and Cagney. Supporting the, was Officer Flynn. The approach was a funnel, but offered some higher ground where Officer O'Brien and Dawg could provide cross fire with Sniper Manny.

Gardia securing firing arcs
Not long after starting the approach, Sniper Manny noticed a lone caravanner approaching from a distant heavily wooded area in the southwest of the town. When he was able to get the caravanner in focus, he was able to identify him as Sven of Killee's band. With a quick shot, he caught Sven by surprise and was able to send him scrambling for cover. After this an additional caravanner made a hasty approach toward the location of the relic vehicle.

It was quickly apparent that Killee's caravanners were in the area for the same reason as the Gardia, to recover the relic vehicle. As with many things in the wasteland, success is not guaranteed and as insurance the old man had hired another group.

Caravanners moving to secure relic
Mutt sent the K-9 units forward to engage, but when Cagney went to spring from the wooded hillock, she was wounded and could not go further. The set of mutants that Killee picked up a few weeks ago quickly moved through the ruins to try to secure the vehicle and make off with it. Marshal O'Halihan was able to quickly mark the mutant, Stop, and put him out of action. At the same time Officer Flynn caught Pots with near-hit and sent him scrambling for cover.

Quickly the rest of the caravanners made headlong for the relic in an attempt to overwhelm the smaller Gardia force. Sniper Manny was able to quickly put Sven down in the woods to keep him from the engagement. The other officers, Scullin and O'Brien made approach to the relic through the ruins to create firing arcs to prevent the Caravanner advance.

Gardia approaching through ruins
Marshal O'Hallihan and Officer Flynn took up locations at the tops of the hillocks to use the tree coverage and provide additional firing arcs to prevent Caravanner advance. Marshal O'Halihan was able to quickly Ms. Perfect as she returned fire from the corner of the ruined building. Marshal O'Halihan proved a better shot and put Ms. Perfect down. Killee opened up on Officer Scullin with her submachine gun, but none of the three shots were sufficient to penetrate the officers armor.

The caravanners continued the all out press toward the vehicle, taking up second story positions on the building at the southwestern corner at the vehicles location. Marshal O'Halihan took advantage of the close proximity of the caravanners and was able to quickly hit Mrs. Argyle, Swifty, and Mr. Flash. Where Swifty was wounded, the other two were downed and out of the engagement. Officer Flynn was able to put a shot on Mrs. Stuffings, but it was just a grazing shot and she went to cover but was not wounded. ant
Gardia eliminating caravanner rush

Officer O'Brien was able to keep Black Widow pinned down in the woods to keep her out of the engagement while Sniper Murphy was able to eliminate the mutant Pots that previously fled the engagement. These last actions effectively eliminated the potential for the caravanners to continue the engagement and with the loss of overwhelming numbers and at a tactical disadvantage, Killee withdrew her group and abandoned the vehicle. The Gardia cannot determine the nature of the vehicle as it appears to be some high technology that would risk obliteration if activated. If that was even possible still.

Post Activity Update

Midpoint Algoryn AI Squad Figure
When the Gardia salvaged the Depend O'Bot ($6.50) in the Wasteland encounter, I immediately purchased two from This Is Not A Test. But with the combination of personal things and pre-registration for AdeptiCon 2016, I went back to the Liber Metallica Seminar with Dave Taylor I had taken. With this seminar, we received a Warlord Games Gates of Antares figure, specifically one of the Algoryn AI Squad figures ($32.00 squad of 5 metal figures). This seemed like a good figure to use and it had the bonus of already being assembled and primed.

I decided to implement the Liber Metallica method with this figure so I started with by coloring all of the metal components with Vallejo Gunmetal Grey. This was the darkest of the gunmetal type paints that I have. I followed this immediately with a wash of Secret Weapon Miniatures Soft Body Black Wash ($2.99). Now one of the important aspects of this method is to repeat color with washes to change the tone color up and down as you go, remembering that the light is coming from above.
Finished Algoryn AI Model (Front View)

I tried very hard to keep the color scheme to a very limited palette. To deepen the spaces between the armor plates, I lined with Vallejo Black Ink. The cables were painted with Vallejo Black Grey and then washed with the Soft Body Black again. The gun was based with Vallejo Black and then there are touches of Vallejo Tinny Tin to give it a little pop. Who doesn't want a gun with a little pop.

Finished Algoryn AI Model (Rear View)
He has a series of belt pouches and a jet pack on his back. I decided to give these a little color to break up all of the shades of black and grey. The base color for the pouches and backpack was Vallejo Dark Red. This is a really flat red and not really dark or deep. I layered above on the elevated surfaces of the backpack with Vallejo Flat Red. The vent for the jet pack got some touches of Vallejo Gunmetal Blue to give it a little of the heated metal look. The belt pouches were limited to the dark red. I also gave some touches to the face and the emblem on the shoulder pad with the dark red.

Now all of this didn't provide any highlights on the figure. To achieve that, I went to the Citadel Chain Mail. This is a lighter silver color. I applies this to the exposed surfaces of the figures, trying to imagine those parts that would get the most light and therefore be the brightest/most reflective. While it is entirely clear that I need some more work on tackling this technique, I am happy with the results and this will make a nice addition to the Gardia.

Achievement Unlocked!

Bronze Bombardier Award
With all of the goodness at Bombshell Miniatures, it hardly seems appropriate to get recognized for supporting them. Last week though, I received an unexpected package from Bombshell. Inside was great looking pin and with a certificate indicating that I achieved the Bronze Bombardier Award for my continuing level of  support. In addition to this was a very nice hand written note from Patrick Keith thanking me for my continued support and help with spreading the good word on his materials. So my thanks to everyone at Bombshell Miniatures for the great stuff they produce and I look forward to the challenge of achieving Silver and Gold levels!


Sunday, November 8, 2015

Mayday! Mayday! We need heavy support! Counterblast Heavy Support Kickstarter!

Counterblast Heavy Support Kickstarter


Counterblast Kickstarter Fullfillment
Bombshell Miniatures started the Counterblast Heavy Support Kickstarter campaign on May 4, 2015 and it concluded on May 15th, so not much time to get funded but they were successful once again.

The Kickstarter had three levels of support, the Cadet ($2), Digital ($5), and Ultonium ($100). The Cadet was designed to allow you to get into the Kickstarter and purchase any add-ons separately. The Digital level was to allow access to the digital version (pdf) of the Counterblast rules ($9.99). The Ultonium level, which I selected, gave you the any selection of reinforcements and add-ons and the Bomb Kit.
The Bomb kit was the package of "freebies" that were unlocked during the campaign, which ended up including a set of equipment and tools, Edo arc weapons, Neiran weapons, and a lovely Bombshell Babe.

To complete my selections, I decided the Lancer Barracuda Rocket Bike was just too fantastic, so I got two of them. (There is an alternate version, the HS38 Rocket Bike ($16.99) which you can also get if you wanted some different options/looks.) Now while it is great to have a cool set of rocket bikes, you need a faction/warband to play the game, so I went with the Lancer Heroine Crew Set. These will also be used to lead up a new all female warband for This Is Not A Test. As I develop this new warband and paint through them, blog posts will be developed for them. Keep an eye out, those will hopefully get started in December. Just a note, when the models go live on the Bombshell web store, I will update this post with links to all of the Counterblast models.

I picked up a few little helpers/assistants, because who doesn't need support. For me it was the M.i.N.E. bots ($2.99 each) and Shrapnel ($2.99) (twilight zone-style goblin). These are all great sculpts as everyone expects from Bombshell. Glad I was able to get in on the Kickstarter and now let's paint some M.i.N.E. bots.

M.I.n.E Bots


MinionTM
As you can clearly see, these little guys make the perfect, um...what's the term, minion for all your evil scientist needs. There are a few options for M.I.n.E bots from Bombshell. You can get the individual models or you can get a set of three ($14.99). The set of three include two bots with double sets of visual components (eyes) and an array of arms that can be added. I don't have these yet, but it is another on the list of things to get.

Originally, I was going to paint this in a distinct color scheme, but once the kids saw them; it was apparent what color scheme I was going to use. So, let's start with the primer. Since I wanted to paint these yellow, I went with Army Painter Barbarian Flesh primer. This gives a nice mild brown color which makes the yellow a bit deeper. I used a few layers of Vallejo Model Color Flat Yellow. The first was to cover and as the layers progressed, the yellow became more thinner to allow for a smoother finish. The pants were painted with Vallejo Model Color Flat Blue. The belt section between is Vallejo Model Color Blue. This is a little deeper and breaks the yellow and blue pants. For the surrounds to the optics, the shoulder mounts, and the attennae mount, I used Citadel Leadbelcher so it was metal but not too shiny. For the optics, I started with Vallejo Light Grey. This includes the interior of the surround. I mixed up a 50:50 mix of the Light Grey and Reaper HD MSP Spectral White and added a smaller section of the optics center. The next layer added some Vallejo Model Color White to the mix. This made for a very near white. To give a small area of light to the optics, I used a small area of pure Vallejo White.
Finished MInE bots

With the highlight to the optics, I decided it was now necessary to add some highlights to everything else. This required an addition of Vallejo Model Color Fluo Yellow to the top left side of the body. To the optic surrounds, I added some highlights of Citadel Bolt Gun Metal. Looking at pictures of actual Minions, the boots and hands (Minions where gloves) were painted up with Vallejo Black Grey. The Minions where black boots and gloves, but this usually comes out too shiny. The boots and gloves were washed with Vallejo Dark Grey Wash. That gives enough depth to the boots to make them look like actual black boots. The antennae were also painted with the Citadel Bolt Gun Metal so they were different than the antennae mount.

I decided to keep these really clean, mostly because the kids will love them looking much like the actual Minions. I'll have to pick up some more so that I can make a couple of little rust buckets with bent antenna. These are some great sculpts and were a lot of fun to paint up. Next will be to figure out how I am going to base these. Thinking of some tech deck for something industrial or lab like.

Movember 2015 Campaign 


While Bombshell is well known for the Bombshell Babes and now Counterblast, I want to remind everyone that this is Movember. I am again doing what I can to raise awareness and donations for men's health and research. If you are willing to make a donation, you can do so here: http://mobro.co/chrislayfield. There you can find the link to donate, can find updates that I post regularly, and more information about men's health. So please donate and don't be a dick, save one.

Thanks,
Chris

Wednesday, November 4, 2015

Reaper Miniatures Halloween Tricks and Treats!

Reaper Miniatures Halloween Haul


Reaper Halloween Package
As I posted in the "It's Jack, My Little Pumpkin Pal by Bombshell Miniatures" post, Reaper Miniatures offers a Halloween special every year. I decided again this year to take advantage. So to meet the criteria for Reaper deal, I had to spend $40. Not hard for a miniature gamer or painter, I know.  I have been looking for additional K-9 units for the Gardia for This Is Not A Test and that led me to more eventual fun.

Ghoulie Back Contents
So first, let's review the deals. There are actually two deals that occur during October. The first is automatic for all purchases adn last for the entire month of October. When you make an order to Reaper in October, you will automatically get a bottle of the Reaper Breast Cancer Pink paint. If you want to see the color of this paint, check out the NOVA Open Seminar - Sculpting with Raffaele Picca of Massive Voodoo! post. I used it for the skull plates carved into the Reaper BONES Chaos Well.

Ghoulie Bag BONES
If you place a $40 order after October 4 and before midnight on October 31, you may also get a Ghoulie bag. This is a while supplies last, but I made my order one week prior to Halloween and received a Ghoulie bag.

Each Ghoulie bag contains four bottles of Reaper MSP HD paint. This year it was Spectral White, Pumpkin Orange, and Mouldy Skin. Somehow there was a mix-up in packing, because I ended up with the first bonus, an extra Spectral White. The second part of the Ghoulie bag is something a little nostalgic for Halloween, candy! I got a piece of double bubble, a banana Laffy Taffy, and a Tootsie pop. But best of all, there is the trick or treat part.

Trick or Treating isn't over though, because there is one additional part of bonus. For most people you will get a treat, but for an unlucky one, well you might get a rock. I mean literally a rock, though it is a rock in a special blister pack. I was lucky enough to get a treat, because the bonus Spectral White wasn't enough.  There was a blister pack that contained a maiden, let's call her Miss Muffett, and a giant spider. I didn't see any curds and whey, but these will be fun to paint up. So let's see what got me to the $40 threshold.

My Purchase


Pug Dog
Here is what I decided to get, mostly to supplement all of the This Is Not A Test playing. First up are a set of additional dogs for the Gardia (Peacekeepers). I already have two that are K-9 Units, Dawg and Cagney, from the BONES Kickstarters, but with the potential to add more K-9 units and another K-9 Handler, I could use more.

Of the three dogs that I purchased, I'm not sure that all are directly usable as K-9 units. The first is a great little Pug Dog ($2.44) which was irresitable. My mother has a pug, so when I saw this I had to get it, Now this little pug is half the size of my mother's but I will name her Abby all the same. I am not sure the Pug would be a legal miniature for use in This Is Not A Test. It is adorable, but really diminutive. Make sure your opponent(s) is okay with the use of this figure before fielding.

The next up is a prime war dog and one that will look imposing on the board. Garr the War Dog ($6.49) is large and demands attention. Garr is quite the opposite of the pug dog, since he is an English mastiff and incredibly large. The figure looks great and English mastiffs are well known for attacking an intruder and pinning them down until back-up arrives to dispatch the intruder. The only issue that I see with this miniature is with the base. The metal bottom does not quite fit into the base cut-outs. I don't see this as a true issue since I am more than likely not going to use the blank base and will remove the metal tabs.

Death Dog
The last is a real beast and large. This will be a great addition either as a Wild Dog mutant beast or some sort of K-9 mutant. Either way, it won't be nice to encounter. The two-headed Death Dog ($12.95) will get them coming and going. Larger than Garr with twice as many teeth. The pose is one of either lunging or jumping and the snarling jaws are ready to snap an opponent's arm (or neck) in two.

While I love the Gardia, having options to play a different warband would give us more options for game play, gives me additional ways to run stories, and allows me other options for painting and development. I think for the most part, these will make a great starter either for Preservationists or Caravanners. The final three miniatures I purchased will be the perfect start to a new warband. First is the Deadlands Noir Patent Scientist ($5.99). Equipped with what could be a ray gun, heat gun, or maybe a radar gun, this has all the hallmarks of a preservationist with the desire to find relics and use them. Next up is a more versatile and seeming made for the wastes, Post Apocalyptic Hunter ($6.29). He is well armed and prepared to take on whatever the wastes may throw at him. Evie, Post Apocalyptic Survivor ($5.99) is packed and ready for a move, which is why I see her clearly as a potential for either the Caravanners or Preservationists. She carries what she needs and what she doesn't have, she takes with her sub-machine gun. Because the bonus for Breast Cancer Awareness, the Ghoulie bag, and mistaken packing wasn't enough, I also got an extra Deadlands Noir Patent Scientist in the package.

Time to take out the Trash

Modifying the Dumpster

Dumpster Components
The last thing I got was a piece that I have been thinking about for some time and finally decided to add this as a piece of scatter terrain for This Is Not A Test, the Reaper Dumpster ($4.99). This is considered part of the BONES line, but is not made of the same BONES material. The plastic is a hard plastic that is much more like the plastic in most of the toy soldiers we are love to collect, paint, and play. This piece takes primer with no problem. This is a great looking piece, though I do have one issue with it.

Holding Dumpster Lid Open
The has a great look and the lid opens, but does not open fully. The piece is playable inside, but the design of the lid does not stay open. To me all terrain should be playable, but if the lid doesn't stay open the usefulness is limited. You can have someone go into the dumpster and hide, but you can't have someone jump into it and fire out of it. So I decided it needed some alter altercations.
Closed Dumpster

The dumpster is large enough to easily contain two 28 mm figures. I tested it out with Evie and the Post Apocalyptic Hunter with no problem.

Grab your trusty utility knife, it is time for some surgery. The first part to tackle is the line of hinges at the top of the lid. I have a wide array of blades for my hobby knife and for this task, I used a large chisel blade. You can see the size in the Final Modified Dumpster with Lid Open picture. I started by marking out where the lid hinges came into contact with the cover/lid piece. I then used the chisel blade to add a notch to the cover piece. The notch pretty much has to run the entire expanse of the cover piece and almost to the full depth. Be sure not to go to the full depth as the little shelf build into the lid would be removed. That accounts for the hinges.
Hinge Cut in Dumpster Top

Now that the lid can open to a fuller range, it is time to make it stay open. In order to accomplish this, you will need to make one additional set of cuts. The lid extends further than the hinges and those little extensions need to go someplace and to keep it up, need to stay there. Just beyond and below the notch we made previously, we now need to cut a space for the sides of the lid. This is just a small square notch so that when the lid open, it catches and then will stick in place. Now you have a dumpster that you can open, climb into, and then hide or fire.
Final Modified Dumpster with Lid Open

Painting the Dumpster

Around me, we have a company called Waste Management. They are an incredibly large company that provides dumpsters of every size for commercial, industrial, and residential needs. Since it is ubiquitous to this area and I plan on using this for This Is Not A Test, it seemed a natural fit for the dumpster. The first part of achieving this was to paint up the dumpster to match the Waste Management colors. The dumpsters they have are green. Now being colorblind, I am not able to exactly match colors, but hopefully I got something pretty close. I chose to go with the Vallejo U.S. Dark Green for the color. The lid was painted with Vallejo Black. I also used the black as the base for the interior bottom of the dumpster.

Base Colors on Dumpster
Making the dumpster appropriately weathered as it had survived nuclear fallout and an additional hundred years required a great deal more work. I immediately thought of my stockpile of Secret Weapon Miniatures pigments. I got the entire line in exchange for the work I provided them during AdeptiCon 2014. It was a given since after taking the Weathering Pigments class with Mr. Justin, I knew I needed them. You can read about those experiences in the Weathering Pigments blog post.

Steps to perform the weathering and creating materials to fill or supplement the dumpster will come in a follow-up blog post. I expect that post to come in a week after the dumpster is finished and used in some game play. It will be at the bottom of the next Marshal's report.