Warsen.al Scatter Terrain
 |
| MDF Sheet |
I can't recall how I found this little terrain set, probably a Facebook feed ad or something, but you can pick up the Comanche Scatter Pack for $8. This is a great little kit made of laser cut MDF and plastic. There are no instructions in the kit, so it took me a few minutes to figure everything out, but for you, I took pictures. Even with my normal distractions of children and television, I had all of the pieces assembled in about 30-45 minutes.
From this kit, you can make a plethora of scatter terrain for your board. The components when fully assembled will yield two pallets, six 55 gallon drums, two barricades, two cable wire spools, four Jerry cans, four ammo boxes, two ammo crates, and a satellite dish.
 |
| 55 Gallon Drum Assembly Process |
Let's start with the 55 gallon drums. The majority of the MDF is small circles and at first I couldn't figure out how they were to be used, but it turns out these are the spacers that make the body of the barrels. The plastic sheet contains the top, bottom and middle pieces which are slightly larger to give the appropriate bump outs/edges on the barrels. The picture shows in pictures the assembly, which I did using Aleene's Tacky Glue. Once assembled and dried, you will need to do some sanding to smooth out the centers of the barrel if you want a smooth uniform look. If not, you can prime and paint up.
 |
| Assembled Pallets |
Next up are the pallets. These are really pretty simple overall because there is only one way to assemble them correctly and since everything is pre-cut, it would be hard to assemble them incorrectly. One note though, the boards have pre-cut nail holes in them and you want to make sure they are pointing out. Some of the notches for the thin boards are irregular, so you may want to dry fit them before you glue them in place. I also started on with the larger boards which wasn't terrible, but in retrospect it would have been easier and more stable to start with the thin boards.
 |
| Large Cable Wire Assembly |
Similar to the barrels are the large cable wire spools. I have been looking for something like this for a while and was too lazy to create it myself. I do think though that you can do it very simply with s piece of PVC and some plasticard. I might have to try it soon.
Anyway, the components are similar with the ends made of the plastic and the filler made of the MDF discs. Now if you look closely at the picture, you will see that the discs for the spool are different than the disks for the barrels. Make sure you keep them separate to make the assembly easy. There is a small wooden cuboid which fits snugly in the square cut out in the disc. I know there is some joke about square pegs and round holes, but that is just if you screw it up. When you fit it all together than you should have the holes in the discs lined up with the holes in the ends which makes a nice tunnel through from side to side.
 |
| Street Barricade Assembly |
The two street barricades are pretty simple to figure out and assemble. The only thing that threw me was an extra end piece for the barricades, but you only need four of the five ends to build these. One pretty cool thing about the barricades is that they are marked so that you could paint them up immediately with some pattern (black/yellow or white/red) and not have to worry about too much work to get them done.
 These appear to be 5 gallon Jerry cans are three parts per can with the body being MDF and the sides made of plastic. The sides just glue onto the two sides. There is a little notch on the cans, so make sure you pay attention when you are gluing things together. These all fit on and line up very well, so it isn't much of an issue. This is more of a logistics warning.
Once assembled these will be great additions either as stand along pieces or added to any number of tanks or small jeep like vehicles.
If you look to the left of the Jerry can bodies on the MDF sheet, you will notice four little rectangles and I wasn't sure where they went. I looked at the image for the scatter pack a bunch of times and couldn't see anything there. But at the end of the time, I figured out that they were 4 ammo boxes and apparently no assembly necessary. In fact these aren't even included in the description of the set, so happy bonus!
 |
| Jerry Cans and Ammo Crates |
The two tires are made of four pieces and completely plastic. Each part has a set of nubs carved on the exterior. When all put together it makes the tread for the tires. One interior piece has the spokes for the tire and the other has is just a cog looking piece with nothing in the interior. The exterior pieces have some etching to look like the exterior of a tire, duh. So long as you have the etched pieces facing out, you can easily glue them together and be ready for prime and paint.
 |
| Satellite Dish and Tires |
This is a great set of terrain and incredibly affordable. I am looking forward to getting it painted up and ready for the tabletop. Definitely check them out for more more pieces especially if you play Infinity, that is the majority of the offerings.
Kickstarter News
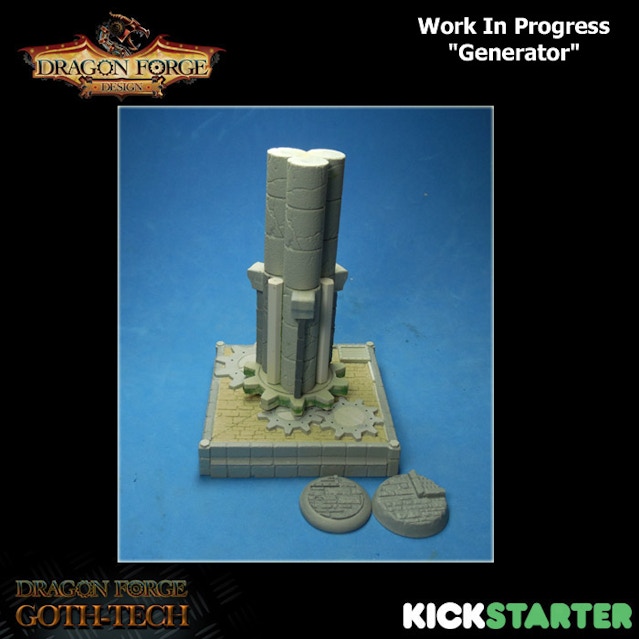 Three Kickstarter campaigns that I wanted to tell you about. The first is the latest from Dragon Forge Designs - Goth-Tech Expansion Bases and Accessories, which I mentioned previously. This has achieved funding level and unlocked a couple of stretch goals, the latest getting every a free ammunition objective marker. As I write this the campaign is about $100 dollars from unlocking stretch goal number 6 ($1800). This will unlocked another set of oval bases. Down the road a ways is this generally named "Generator" which is in process. This is a marker or general terrain piece and stands rather large. Currently the aim for this is a $3000 stretch goal, so a little while to go. To see us there though, a bunch of other stretch goals are laid out already. If you have a tech-based army, this is a good opportunity to get in on some top-notch base sets.
 The second is a cool set of Slavic Fantasy Miniatures which have been sculpted for Deraj Studios. The miniatures are 32 mm, so suitable for pretty much any tabletop campaign or RPG. The miniatures are high quality resin and based on Slavic folklore. Sculptors include Kamil Smok Milaniuk, Prezmyslaw Szymczyk, and Patrick Keith (Bombshell Miniatures). This has already doubled the original funding goal, so additional miniatures are being developed. There is a really amazing Rooster which has been hollowed out to be a home and walking about.
 These figure support a game as well, Portals: Worlds Collide which looks to allow you to bring many universes together for a table top skirmish game.

The last on the list today is the Trash Bin Bits Part 2! campaign by Brian Roe. This is the follow-on to the previous Kickstarter campaign. In this campaign, Brian brought us another round of pretty great looking sci-fi doors/windows/covers to bring your trash bin creations to life and finish them off with style. You can see the amazing sets that are now available as high quality resin bits. These are perfect for the DIY modeller who can take cardboard packaging inserts, CD cases, and otherwise discarded materials and make some top notch sci-fi terrain. I am glad to have gotten in on this campaign and am eagerly looking forward to the materials being cast and sent to me.
Hopefully all of this come before I move so I don't have to worry about mail/package forwarding. Anyway, keep your eyes open for more exciting Kickstarter opportunities and if you have others of interested, add them in the comments section.